User Manual: Difference between revisions
Jens.olsson (talk | contribs) |
|||
| (40 intermediate revisions by 3 users not shown) | |||
| Line 1: | Line 1: | ||
== General == | == General == | ||
Crystal Alarm allows users to activate timer alarms and direct alarms to a monitoring centre. It is always possible to set off the alarm, regardless of whether or not one has mobile network coverage. As soon as the telephone is able to communicate, the alarm will be activated at the monitoring centre. | Crystal Alarm allows users to activate timer alarms and direct alarms to a monitoring centre. It is always possible to set off the alarm, regardless of whether or not one has mobile network coverage. As soon as the telephone is able to communicate, the alarm will be activated at the monitoring centre. Once the personal alarm is installed and activated on an Android smart phone for the first time, it will launch automatically when the phone is turned on. iPhone-users, however, must themselves launch Crystal Alarm after turning on their iPhone. It is enough for Crystal Alarm to be running in the background in order to send an alarm. With Android-phones, the alarm can be set so that it may always be activated by repeatedly pressing the on/off button until the phone starts vibrating; this function is not available with iPhone. The personal alarm uses both SMS and Internet communication to guarantee the greatest possible accessibility. The communication channel used is also dependent on the phone you use. | ||
'''Functionality''' | '''Functionality''' | ||
| Line 6: | Line 6: | ||
The personal alarm has several functions and modes: | The personal alarm has several functions and modes: | ||
1. Direct alarm via a button on the telephone’s exterior. | 1. Direct alarm via a button on the telephone’s exterior.(Android Only) | ||
2. Direct alarm via an external button | 2. Direct alarm via an external button | ||
| Line 16: | Line 16: | ||
5. Connection to internal or external monitoring centre | 5. Connection to internal or external monitoring centre | ||
The functions and modes available in a specific installation are | The functions and modes available in a specific installation are determined by the organisation within which the alarm is being used. Features can be activated centrally but, if the organization so decides, it is also possible for the individual users to adjust certain functions themselves. These settings may be found in Crystal Alarm’s set-up menu. | ||
== Installation and activation == | == Installation and activation == | ||
There are two ways of installing Crystal Alarm on your telephone. | There are two ways of installing Crystal Alarm on your telephone. You can either download Crystal Alarm from the App Store (for iPhones) or Google Play (for Androids) or you can install a modified version available via a link within your organisation. The modified version may be set up specifically for your organisation and therefor need no further activation. If your organization is providing a modified version, it is important that it is used owing to the extended functionality over the versions available from the App Store and Google Play. | ||
If your organisation has a modified version of Crystal Alarm, it is important to use the installation link (see below). | If your organisation has a modified version of Crystal Alarm, it is important to use the installation link (see below). | ||
== Installation == | == Installation == | ||
[[File:install_crystal_alarm_android.png]] | |||
'''Android via Google Play''' | '''Android via Google Play''' | ||
| Line 38: | Line 40: | ||
4. Touch Crystal Alarm where it appears in the list | 4. Touch Crystal Alarm where it appears in the list | ||
5. Touch the | 5. Touch the install button to proceed | ||
6. Touch the button to start the installation | 6. Touch the button to start the installation | ||
[[File:install_crystal_alarm_iphone.png|800px]] | |||
'''iPhone via App Store''' | '''iPhone via App Store''' | ||
| Line 49: | Line 53: | ||
1. Select the icon App Store on your home screen | 1. Select the icon App Store on your home screen | ||
2. Select the tab Search | 2. Select the tab "Search" | ||
3. Touch the Search text field at the top and write Crystal Alarm | 3. Touch the Search text field at the top and write Crystal Alarm | ||
| Line 55: | Line 59: | ||
4. Touch Crystal Alarm where it appears in the list | 4. Touch Crystal Alarm where it appears in the list | ||
5. Touch the button to start the installation | 5. Touch the button "install" to start the installation | ||
The version of Crystal Alarm available from the App Store is a considerably limited version and should not be used if your organisation provides another version. | The version of Crystal Alarm available from the App Store is a considerably limited version and should not be used if your organisation provides another version. | ||
| Line 90: | Line 94: | ||
== Activation == | == Activation == | ||
[[File:AndroidAktiveringS.png]] <br> | |||
'''Android''' | '''Android''' | ||
1. Select the icon Crystal Alarm on your home screen | 1. Select the icon Crystal Alarm on your home screen. | ||
2. Touch the text field | 2. Touch the text field "Activation code". | ||
3. Enter the activation code you have been given by your organisation. | |||
4. Touch Go on your keyboard. | |||
5. Touch "Activate" button to start the activation. Crystal Alarm will now activate your telephone via SMS. This may take a few minutes. | |||
[[File:AndroidNotiPosS.png]] <br> | |||
[[File:AndroidMikBatS.png]] <br> | |||
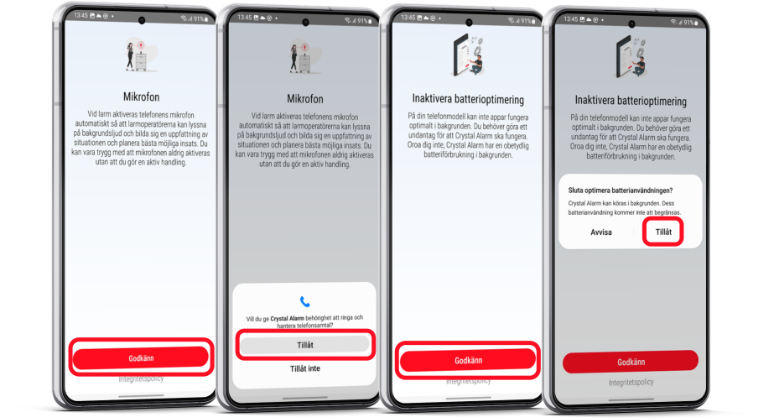
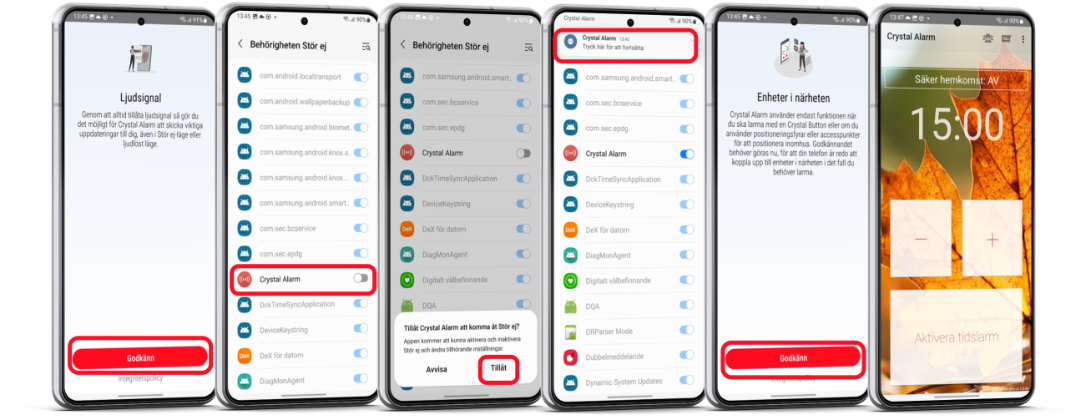
6. When you start Crystal Alarm for the first time, in some cases you are asked to approve rights needed for the application to work properly. It is important that all of these are approved. The required rights are Notifications, Position, Manage calls, Send and receive SMS, Background battery management and DND-mode. | |||
[[File:AndroidLjudS.png]] <br> | |||
[[File:iPhoneActivationS.png]]<br> | |||
'''iPhone''' | '''iPhone''' | ||
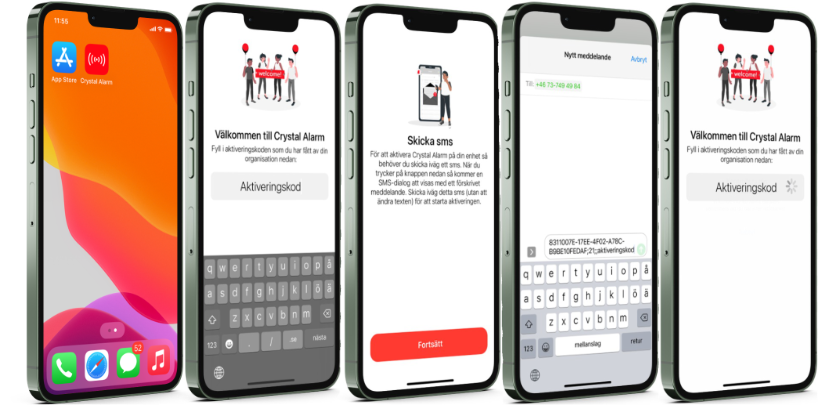
1. Select the icon Crystal Alarm on your home screen | 1. Select the icon Crystal Alarm on your home screen | ||
2. Touch the text field titled "Activation code". | |||
3. Enter the activation code you have been given by your organisation. | |||
4. Touch Next on your keyboard. | |||
5. A dialogue with a predefined SMS is shown on the screen. | |||
6. Touch the Send button to send the message and start the activation. | |||
[[File:IphoneNotPosS.png]] <br> | |||
[[File:iPhonePosMik.png]] <br> | |||
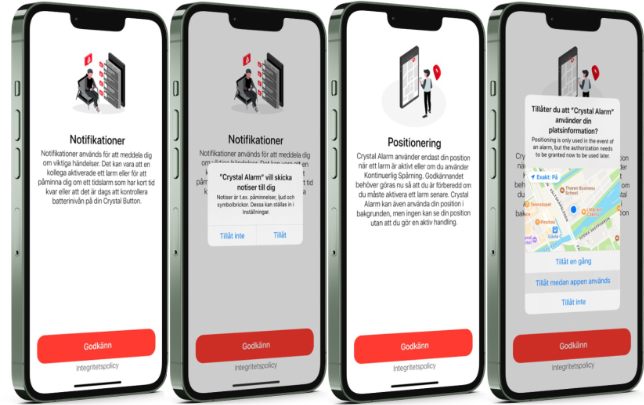
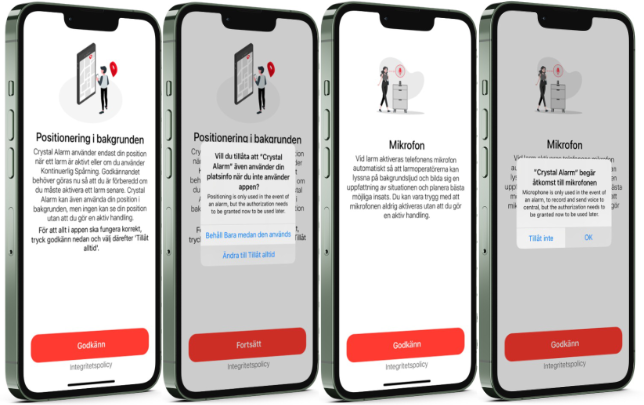
7. When you start Crystal Alarm for the first time, in some cases, you are asked to approve the rights that the application needs. It is important that all of these are approved. The required rights are Positioning, Push Messages and Access to Microphone. | |||
[[File:iPhoneLjudKlarS.png]]<br> | |||
8. Wait until the main menu of Crystal Alarm is shown. | |||
You may use your telephone as normal since Crystal Alarm runs in the background. Crystal Alarm ceases to function, however, if it is turned off. For this reason, never turn off Crystal Alarm and make sure it is running every time you turn on your telephone. | |||
== Self test == | |||
A self test is to be carried out at least every 30 days, to make sure that all the functions needed for the app to be able to function optimal are activated. | |||
If you ignore to do this step your phone will remind you with push notifications until a self test is carried out. | |||
'''Android''' | |||
[[File:Androidselftest.png|800px]] | |||
1. Click on the three small dots in the upper right corner of the app, then click settings. <br> | |||
2. Click the red button with the text "Self Test". <br> | |||
3. Make sure that all the functions are checked. (WiFi is not mandatory, if not applicable.) <br> | |||
4. If a red button with the text "FIX" appears by any of the functions, click the "FIX"-button to fix the problem in the phones system settings. <br> | |||
5. When all the boxes are checked, back up to the main page of the Crystal alarm app. <br> | |||
(Note!: If you have a Crystal Button connected to your app, make sure to test it in this stage. Just make a short press on your physical Crystal Button, and a battery status will appear next to the now checked box.) | |||
----------- | |||
'''iPhone''' | |||
[[File:Iphoneslide6selftest.png|800px]] | |||
1. Click on the small circled "i" in the upper right corner of the app. <br> | |||
2. Click the red button with the text "Self Test". <br> | |||
3. Make sure that all the functions are checked. (WiFi is not mandatory, if not applicable.) <br> | |||
If a red button with the text "FIX" appears by any of the functions, click the "FIX"-button to fix the problem in the phones system settings. <br> | |||
5. When all the boxes are checked, back up to the main page of the Crystal alarm app. <br> | |||
(Note!: If you have a Crystal Button connected to your app, make sure to test it in this stage. Just make a short press on your physical Crystal Button, and a battery status will appear next to the now checked box) | |||
== Alarms == | == Alarms == | ||
A number of different kinds of alarm are available via Crystal Alarm. | A number of different kinds of alarm are available via Crystal Alarm. What functions are made available is determined by the company you work for. Common to all alarms is that your position is sent to the monitoring centre and, where appropriate, to your colleagues. There are two distinct alarm types – direct alarm and timer alarm – which are described below. | ||
'''Direct alarm''' | '''Direct alarm''' | ||
This is the simplest alarm type supported. Using direct alarm, the monitoring centre and colleagues are contacted immediately. The phone is put into alarm mode and, if you use Android, calls can be routed to the monitoring centre so | This is the simplest alarm type supported. Using direct alarm, the monitoring centre and colleagues are contacted immediately. The phone is put into alarm mode and, if you use Android, calls can be routed to the monitoring centre so that the person handling the alarm can hear what is happening around you. The alarm remains activated until closed in the monitoring centre. | ||
When an alarm has been | When an alarm has been sent, the telephone remains in alarm mode until the alarm is closed by the monitoring centre. During this time, it is, in principle, impossible to use the telephone for any other purposes. | ||
'''Timer alarm''' | '''Timer alarm''' | ||
A timer alarm may be started when a risky work task is to be carried out or | A timer alarm may be started when a risky work task is to be carried out or before entering an area with poor coverage. The timer alarm is set to a specific time and sent to the monitoring centre. While the timer alarm remains activated, it sends continuous positional updates to the monitoring centre so that movements may be tracked. The user can easily deactivate the timer alarm when the work task is finished and the danger is over. But if it is not deactivated within the set time, the timer alarm will be converted into a sharp alarm that is set off at the monitoring centre and, where appropriate, colleagues will be contacted with the user’s position. | ||
'''Test alarm''' | '''Test alarm''' | ||
The test alarm is used to test alarm buttons, the headset alarm and Crystal Button. When test alarm mode is activated, the alarm at the monitoring centre | The test alarm-mode is used to test alarm buttons, the headset alarm and Crystal Button. When test alarm mode is activated, the alarm will not go off at the monitoring centre. For this reason it is essential not to leave the alarm in test alarm-mode. If the test alarm has been used, the regular alarm can be reset at the touch of a button. | ||
Do not forget to deactivate the test alarm after a test has been completed. If the test alarm is not deactivated, the alarm will not be active. | Do not forget to deactivate the test alarm after a test has been completed. If the test alarm is not deactivated, the alarm will not be active. | ||
'''Alarm via ON/OFF button''' | '''Alarm via ON/OFF button''' | ||
| Line 168: | Line 213: | ||
'''Settings''' | '''Settings''' | ||
Opening Settings is performed differently on | Opening Settings is performed differently on Android and iPhone. On Android, you press the three dots in the upper right corner of the app, and the the text "settings". On iPhone you click the small circled "i" in the upper right corer of the app. | ||
Your organisation can choose which settings are to be | Your organisation can choose which settings are to be set centrally and which you may adjust yourself. Considering this, you may not have access to all the settings described below. | ||
| Line 213: | Line 258: | ||
On iPhones, there are two alternatives under settings which can be used to change group and assignment. The groups and assignments available are determined centrally by the organisation. | On iPhones, there are two alternatives under settings which can be used to change group and assignment. The groups and assignments available are determined centrally by the organisation. | ||
1. Press the i-button to open settings | 1. Press the i-button to open settings | ||
| Line 250: | Line 296: | ||
7. Crystal Button appears in the list. Select it by touching it. A battery level indicator is also displayed. | 7. Crystal Button appears in the list. Select it by touching it. A battery level indicator is also displayed. | ||
--------------- | |||
[[File:Iphoneslide5.png|800px]] | |||
'''iPhone''' | '''iPhone''' | ||
| Line 267: | Line 315: | ||
To set off the alarm with Crystal Button, press the button for two to three seconds. You can see that the alarm has been activated as the red signal light starts flashing. The light signal is quite subtle so you may have to examine the unit closely to see it. | To set off the alarm with Crystal Button, press the button for two to three seconds. You can see that the alarm has been activated as the red signal light starts flashing. The light signal is quite subtle so you may have to examine the unit closely to see it. | ||
'''Battery check''' | '''Battery check''' | ||
The battery in Crystal Button will last around 6 months, depending on how many times the alarm is set off. Battery life may also vary as a result of heat or cold and the number of times the unit is activated. The Crystal Button battery level should be checked once a month and should have at least two lines. To check the Crystal Button battery level, use the function Connect to telephone (see above), and then activate Crystal Button with a short press of its button. A list of Crystal Buttons in the vicinity is shown with their respective battery | The battery in Crystal Button will last around 6 months, depending on how many times the alarm is set off. Battery life may also vary as a result of heat or cold and the number of times the unit is activated. The Crystal Button battery level should be checked once a month and should have at least two lines. To check the Crystal Button battery level, use the function Connect to telephone (see above), and then activate Crystal Button with a short press of its button. A list of Crystal Buttons in the vicinity is shown with their respective battery | ||
'''Changing the battery''' | '''Changing the battery''' | ||
| Line 277: | Line 327: | ||
Your organisation may have its own procedure for changing batteries; otherwise use the procedure described below: | Your organisation may have its own procedure for changing batteries; otherwise use the procedure described below: | ||
To change batteries | To change batteries follow this link: [[Batteribyte]] <br> | ||
You can also purchase new batteries and a batterychange in our swedish webshop.(Nordic customers only.) | |||
To activate Crystal Button, give its button a short press. It is important that you do not press too long since holding the button down for a longer period activates the alarm. | To activate Crystal Button, give its button a short press. It is important that you do not press too long since holding the button down for a longer period activates the alarm. | ||
Latest revision as of 09:38, 22 August 2023
General
Crystal Alarm allows users to activate timer alarms and direct alarms to a monitoring centre. It is always possible to set off the alarm, regardless of whether or not one has mobile network coverage. As soon as the telephone is able to communicate, the alarm will be activated at the monitoring centre. Once the personal alarm is installed and activated on an Android smart phone for the first time, it will launch automatically when the phone is turned on. iPhone-users, however, must themselves launch Crystal Alarm after turning on their iPhone. It is enough for Crystal Alarm to be running in the background in order to send an alarm. With Android-phones, the alarm can be set so that it may always be activated by repeatedly pressing the on/off button until the phone starts vibrating; this function is not available with iPhone. The personal alarm uses both SMS and Internet communication to guarantee the greatest possible accessibility. The communication channel used is also dependent on the phone you use.
Functionality
The personal alarm has several functions and modes:
1. Direct alarm via a button on the telephone’s exterior.(Android Only)
2. Direct alarm via an external button
3. Timer alarm
4. Alarm to colleagues
5. Connection to internal or external monitoring centre
The functions and modes available in a specific installation are determined by the organisation within which the alarm is being used. Features can be activated centrally but, if the organization so decides, it is also possible for the individual users to adjust certain functions themselves. These settings may be found in Crystal Alarm’s set-up menu.
Installation and activation
There are two ways of installing Crystal Alarm on your telephone. You can either download Crystal Alarm from the App Store (for iPhones) or Google Play (for Androids) or you can install a modified version available via a link within your organisation. The modified version may be set up specifically for your organisation and therefor need no further activation. If your organization is providing a modified version, it is important that it is used owing to the extended functionality over the versions available from the App Store and Google Play.
If your organisation has a modified version of Crystal Alarm, it is important to use the installation link (see below).
Installation
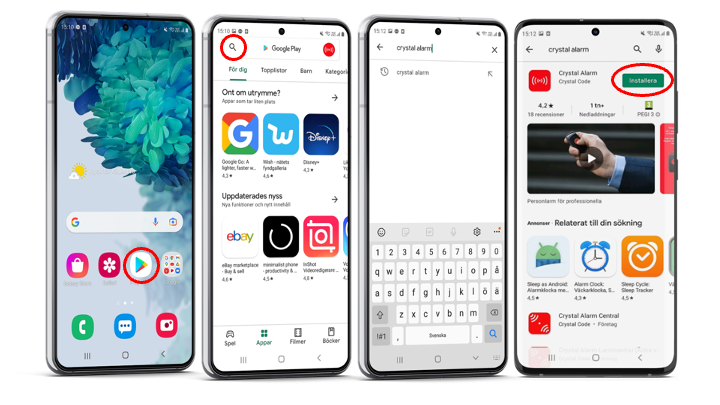
Android via Google Play
To install Crystal Alarm from Google Play, complete the following steps:
1. Select the icon Google Play or Play Store on your home screen
2. Touch the text field Google
3. Write Crystal Alarm
4. Touch Crystal Alarm where it appears in the list
5. Touch the install button to proceed
6. Touch the button to start the installation
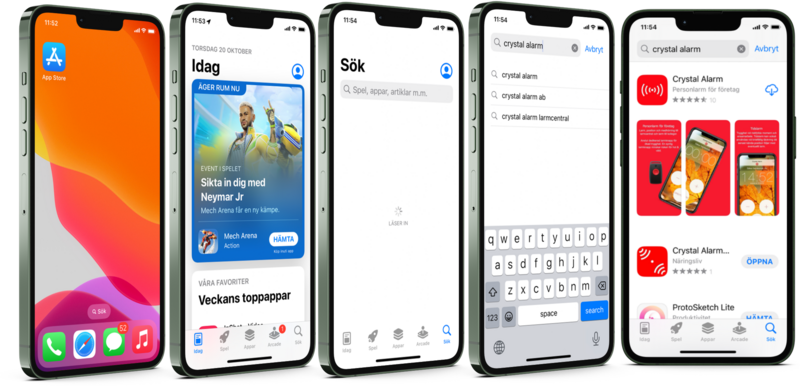
iPhone via App Store
To install Crystal Alarm from the App Store, complete the following steps:
1. Select the icon App Store on your home screen
2. Select the tab "Search"
3. Touch the Search text field at the top and write Crystal Alarm
4. Touch Crystal Alarm where it appears in the list
5. Touch the button "install" to start the installation
The version of Crystal Alarm available from the App Store is a considerably limited version and should not be used if your organisation provides another version.
Android via the installation link
For Android: If your organisation has a modified version of Crystal Alarm, it is important to use the link provided by the organisation. This is because the functionality of the modified version differs from that available from Google Play Store.
1. Open the web-browser on your phone
2. Enter the link provided by your organisation
3. Crystal Alarm now starts loading
4. Installation may be accessed under Files or Downloads depending on the Android model you are using.
5. Touch the file ending in .apk to start the installation
iPhone via installation link
For iPhone: If your organisation has a modified version of Crystal Alarm, it is important to use the link provided by the organisation. This is because the functionality of the modified version differs from that available from the App Store.
1. Open Safari on your phone
2. Enter the link provided by your organisation
3. Crystal Alarm now starts loading
4. Answer Yes to the question: Do you want to install Crystal Alarm?
5. When you start Crystal Alarm for the first time, you will be asked if you wish to trust the developer. Answer Yes to this question to continue.
Activation
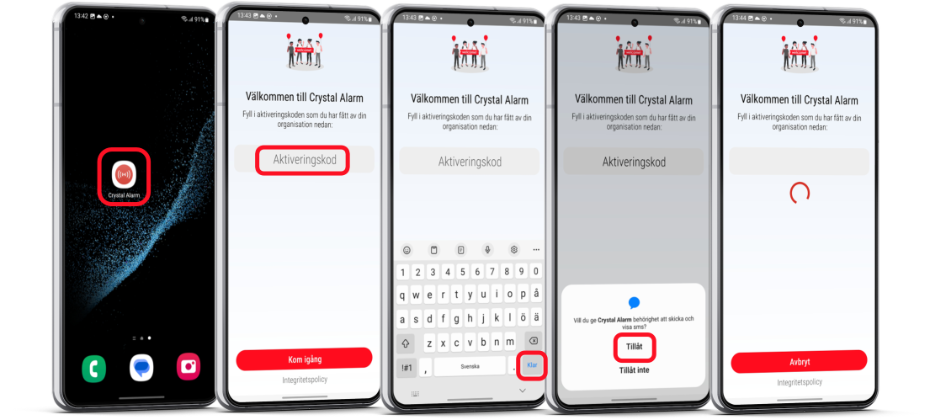
Android
1. Select the icon Crystal Alarm on your home screen.
2. Touch the text field "Activation code".
3. Enter the activation code you have been given by your organisation.
4. Touch Go on your keyboard.
5. Touch "Activate" button to start the activation. Crystal Alarm will now activate your telephone via SMS. This may take a few minutes.
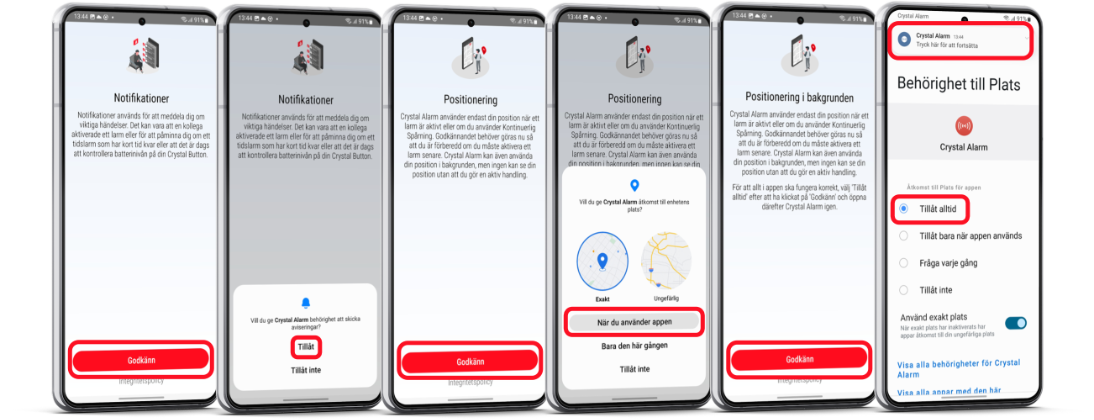
6. When you start Crystal Alarm for the first time, in some cases you are asked to approve rights needed for the application to work properly. It is important that all of these are approved. The required rights are Notifications, Position, Manage calls, Send and receive SMS, Background battery management and DND-mode.
iPhone
1. Select the icon Crystal Alarm on your home screen
2. Touch the text field titled "Activation code".
3. Enter the activation code you have been given by your organisation.
4. Touch Next on your keyboard.
5. A dialogue with a predefined SMS is shown on the screen.
6. Touch the Send button to send the message and start the activation.
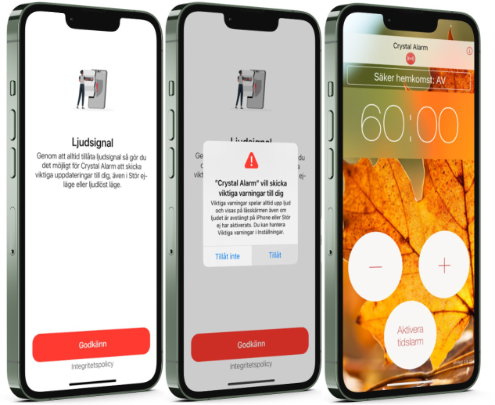
7. When you start Crystal Alarm for the first time, in some cases, you are asked to approve the rights that the application needs. It is important that all of these are approved. The required rights are Positioning, Push Messages and Access to Microphone.
8. Wait until the main menu of Crystal Alarm is shown.
You may use your telephone as normal since Crystal Alarm runs in the background. Crystal Alarm ceases to function, however, if it is turned off. For this reason, never turn off Crystal Alarm and make sure it is running every time you turn on your telephone.
Self test
A self test is to be carried out at least every 30 days, to make sure that all the functions needed for the app to be able to function optimal are activated. If you ignore to do this step your phone will remind you with push notifications until a self test is carried out.
Android
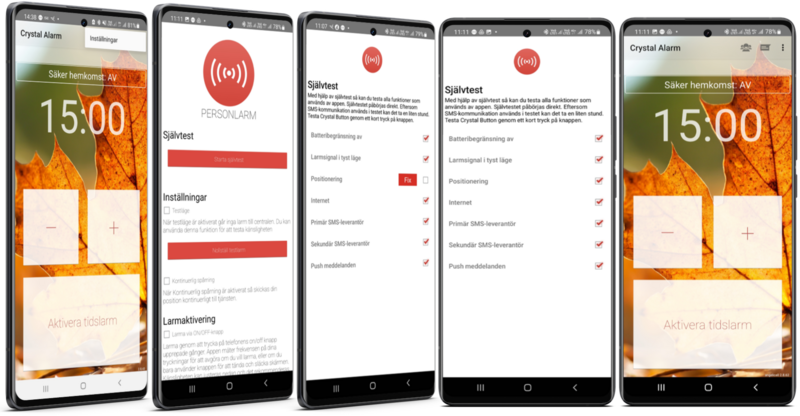
1. Click on the three small dots in the upper right corner of the app, then click settings.
2. Click the red button with the text "Self Test".
3. Make sure that all the functions are checked. (WiFi is not mandatory, if not applicable.)
4. If a red button with the text "FIX" appears by any of the functions, click the "FIX"-button to fix the problem in the phones system settings.
5. When all the boxes are checked, back up to the main page of the Crystal alarm app.
(Note!: If you have a Crystal Button connected to your app, make sure to test it in this stage. Just make a short press on your physical Crystal Button, and a battery status will appear next to the now checked box.)
iPhone
1. Click on the small circled "i" in the upper right corner of the app.
2. Click the red button with the text "Self Test".
3. Make sure that all the functions are checked. (WiFi is not mandatory, if not applicable.)
If a red button with the text "FIX" appears by any of the functions, click the "FIX"-button to fix the problem in the phones system settings.
5. When all the boxes are checked, back up to the main page of the Crystal alarm app.
(Note!: If you have a Crystal Button connected to your app, make sure to test it in this stage. Just make a short press on your physical Crystal Button, and a battery status will appear next to the now checked box)
Alarms
A number of different kinds of alarm are available via Crystal Alarm. What functions are made available is determined by the company you work for. Common to all alarms is that your position is sent to the monitoring centre and, where appropriate, to your colleagues. There are two distinct alarm types – direct alarm and timer alarm – which are described below.
Direct alarm
This is the simplest alarm type supported. Using direct alarm, the monitoring centre and colleagues are contacted immediately. The phone is put into alarm mode and, if you use Android, calls can be routed to the monitoring centre so that the person handling the alarm can hear what is happening around you. The alarm remains activated until closed in the monitoring centre.
When an alarm has been sent, the telephone remains in alarm mode until the alarm is closed by the monitoring centre. During this time, it is, in principle, impossible to use the telephone for any other purposes.
Timer alarm
A timer alarm may be started when a risky work task is to be carried out or before entering an area with poor coverage. The timer alarm is set to a specific time and sent to the monitoring centre. While the timer alarm remains activated, it sends continuous positional updates to the monitoring centre so that movements may be tracked. The user can easily deactivate the timer alarm when the work task is finished and the danger is over. But if it is not deactivated within the set time, the timer alarm will be converted into a sharp alarm that is set off at the monitoring centre and, where appropriate, colleagues will be contacted with the user’s position.
Test alarm
The test alarm-mode is used to test alarm buttons, the headset alarm and Crystal Button. When test alarm mode is activated, the alarm will not go off at the monitoring centre. For this reason it is essential not to leave the alarm in test alarm-mode. If the test alarm has been used, the regular alarm can be reset at the touch of a button.
Do not forget to deactivate the test alarm after a test has been completed. If the test alarm is not deactivated, the alarm will not be active.
Alarm via ON/OFF button
This function is available on Android phones. A direct alarm may be activated by repeatedly pressing the telephone’s ON/OFF button. By means of the telephone’s settings, it is possible to adjust the speed/frequency one needs to press the button, if this is allowed by the organisation. It is important to find a speed/frequency level which is suitable for you and your telephone. Use Test alarm to adjust the level, making sure you will not activate the alarm through normal telephone use and that it is easy to set off the alarm in the event of a an emergency.
Alarm via headset connection
This function is available on Android phones. It is possible to activate the alarm by means of your headset connection point. The function means that you can activate a direct alarm by pulling your headset out of your telephone. If you are not using a headset, it is possible to make use of a small plug in the telephone’s headset connection point instead.
If you do not want to set off the alarm, make sure to deactivate the alarm via headset connection before you disconnect your headset. Alarm via external remote control Starting a direct alarm can be made even simpler by connecting a Crystal Button to your telephone. The unit can, for example, be kept in your pocket, around your neck or on your key chain.
Settings
Opening Settings is performed differently on Android and iPhone. On Android, you press the three dots in the upper right corner of the app, and the the text "settings". On iPhone you click the small circled "i" in the upper right corer of the app. Your organisation can choose which settings are to be set centrally and which you may adjust yourself. Considering this, you may not have access to all the settings described below.
Feedback
After a direct alarm is activated or a timer alarm set off, the following messages are sent to your phone to inform you of what is happening:
- The alarm has been received by the monitoring centre
- The alarm is being dealt with by the monitoring centre
- The alarm has been deactivated by the monitoring centre
After the last message has been received it is possible to use your telephone normally again.
Alarm to colleagues
If your organisation has activated this function, any alarm is sent on to colleagues. It is possible to send the alarm to all colleagues but this is usually controlled in one way or another. It may be, for example, that the alarm is only sent to colleagues on the same team or in the same building. It can also be linked to the scheduling system so that all colleagues on the same shift are sent the alarm. Your colleagues will be informed about who it concerns and can access the position of the person in distress using a link to a map.
Group and assignment
If your organization has activated this function it is possible to dynamically change the alarm group you belong to and also to select the assignment you are working with. These functions may be used very differently depending on the organization. In some organisations, you can actively choose the group and assignment directly in the app, while in others this happens automatically. The alarm group determines which colleagues are to receive the alarm. It is therefore important that you are always in the correct alarm group so that your colleagues can come to your aid in the event of an alarm. Noting assignments is primarily to provide extra information to the monitoring centre, so they know more than just your position and can take the best measures possible.
Change group and assignment on Android
On Android, two buttons are used in the navigation row to change group and assignment. The groups and assignments available are determined centrally by the organisation.
1. Touch the Group button in the navigation field
2. Select the group from the list
3. Touch the assignment button in the navigation field
4. Select assignment from the list
Change group and assignment on iPhone
On iPhones, there are two alternatives under settings which can be used to change group and assignment. The groups and assignments available are determined centrally by the organisation.
1. Press the i-button to open settings
2. Touch the row Alarm group
3. Select the group from the list
4. Touch the row Assignment
5. Select the assignment from the list
Crystal Button
With Crystal Button, an alarm is activated by depressing the button for 2-3 seconds. Crystal Button has one button and two light-signals, red and blue. When the unit’s blue light is flashing, it means that the unit is active; when the red light is flashing, it means the alarm has been activated. The unit itself is activated with a short press of the button. It then remains active for two minutes. When the alarm activated, it remains active for three hours before returning to sleep mode.
System requirements
For Crystal Button to function, it requires iPhone iOS 8.0 or later or Android OS 4.3 or later. Bluetooth must be enabled on your phone. Telephone connection Crystal Button is initially in sleep mode. It is silent and does not communicate with the outside world. In order to connect Crystal Button to your telephone, it must first be activated. Activate Crystal Button with a short press of the button. Take care not to hold the button down too long as this activates the alarm. After the unit has been activated, follow the instructions below for the two respective platforms.
Android
1. Press the Menu button if it is a Samsung or at top right for others
2. Touch Settings
3. Swipe down to the bottom.
4. Verify that the check box Use external button is activated
5. Touch Connect Button
6. Activate Crystal Button with a short press of its button
7. Crystal Button appears in the list. Select it by touching it. A battery level indicator is also displayed.
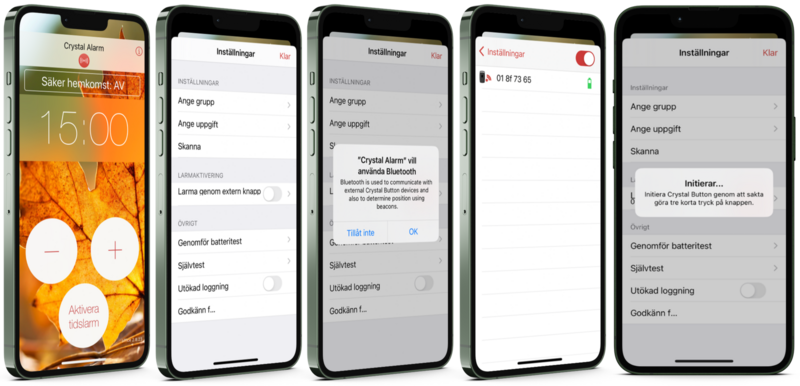
iPhone
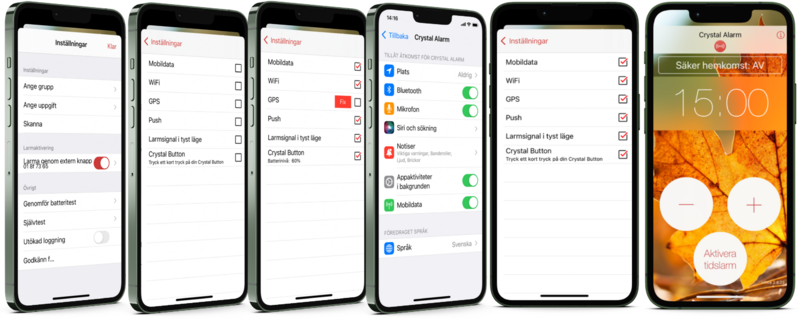
1. Press the i-button to open settings
2. Verify that the External button to the right is activated
3. Touch the External Button line to proceed
4. Activate Crystal Button with a short press of its button
5. Crystal Button appears in the list. Select it by touching it. A battery level indicator is also displayed.
Alarm
To set off the alarm with Crystal Button, press the button for two to three seconds. You can see that the alarm has been activated as the red signal light starts flashing. The light signal is quite subtle so you may have to examine the unit closely to see it.
Battery check
The battery in Crystal Button will last around 6 months, depending on how many times the alarm is set off. Battery life may also vary as a result of heat or cold and the number of times the unit is activated. The Crystal Button battery level should be checked once a month and should have at least two lines. To check the Crystal Button battery level, use the function Connect to telephone (see above), and then activate Crystal Button with a short press of its button. A list of Crystal Buttons in the vicinity is shown with their respective battery
Changing the battery
If the battery level is low, that is to say one line or less, then the battery must be changed.
Your organisation may have its own procedure for changing batteries; otherwise use the procedure described below:
To change batteries follow this link: Batteribyte
You can also purchase new batteries and a batterychange in our swedish webshop.(Nordic customers only.)
To activate Crystal Button, give its button a short press. It is important that you do not press too long since holding the button down for a longer period activates the alarm.
Troubleshooting
Activation
The unit hangs while waiting for activation
Check with your organisation that your telephone number is registered in the system. Only registered telephone numbers may be activated into service.
Alarm
The unit does not provide your position to the monitoring centre
In order for the unit to send your position to the monitoring centre, you must have answered YES to the question Crystal Alarm asks about positioning immediately after installation. Service location must also be activated on your telephone. Both these settings can be corrected in Settings.
No alarm with Crystal Button alone
For Crystal Button to work, it has to be connected to a telephone. Bluetooth must also be activated on the telephone concerned for the unit to function. Some Android phones have a fault that results in Bluetooth not functioning correctly immediately after being activated (if it has been turned off earlier). The problem can be solved by restarting your phone.
Settings
No alternative for connecting to Crystal Button
For Crystal Button to function, your telephone must support Bluetooth 4.0. This generally means iPhone 4S or later, or Android 4.3 or later.
